


The open-source community is about to benefit greatly from Netdata’s new Grafana data source plugin, which makes use of a powerful data collection engine.
This new plugin maximizes the troubleshooting capabilities of Netdata in Grafana, making them more widely available. Some of the key capabilities provided to you with this plugin include the following:
- Real-time monitoring with single-second granularity.
- Installation and out-of-the-box integrations available in seconds from one line of code.
- 2,000+ metrics from across your whole Infrastructure, with insightful metadata associated with them.
- Access to our fresh ML metrics (anomaly rates) - exposing our ML capabilities at the edge!
Why did we decide to do it?
We are huge fans of Open-Source culture. Open-source is deeply rooted in Netdata’s DNA. Because of this, at Netdata, we don’t really buy into the “single pane of glass” or “observability platform” buzzwords. The reality is that things are just more complicated than that in real life.
Instead, we want to focus on what we currently do well while also providing as much easy interoperability as possible with other important tools in the ecosystem, with Grafana obviously being a majorly important one.
How does it work?
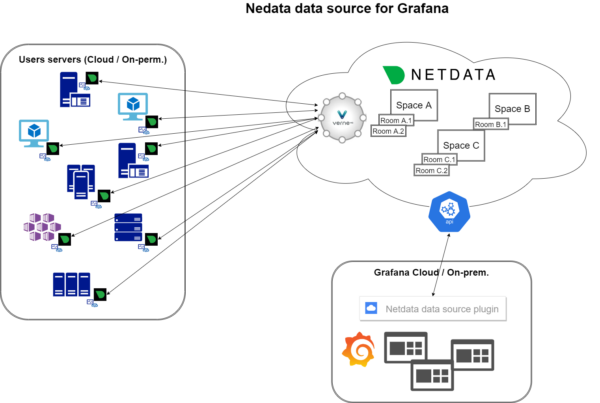
Netdata’s data source plugin connects directly to our Netdata Cloud APIs, meaning that you’ll need to have your nodes (hosts) connected to Netdata Cloud in order to be able to have them exposed on our plugin. For security purposes, you will also need an API token for authentication (which you can get from within your Netdata profile).
The Netdata Agent will need to be installed and running on your server, VM and/or cluster, so that it can start collecting all the relevant metrics you have from the server and applications running on it.
If you already have a Netdata Cloud account created, most probably during installation you already have connected it to a Space and Room; the connecting command provided from the Netdata Cloud does this, if you haven’t, you need to sign up to create an account and connect your Nodes to the Space(s) and Room(s), organizing them the best way it suits you or your organization (you can find some guidelines here).
Once you have all your nodes connected to Netdata Cloud you must proceed with creating an API token, which will be linked to your Netdata Cloud account. The API token provides a means to authenticate external calls to our APIs, allowing the same access as you to the Spaces and Rooms you can see on Netdata Cloud.
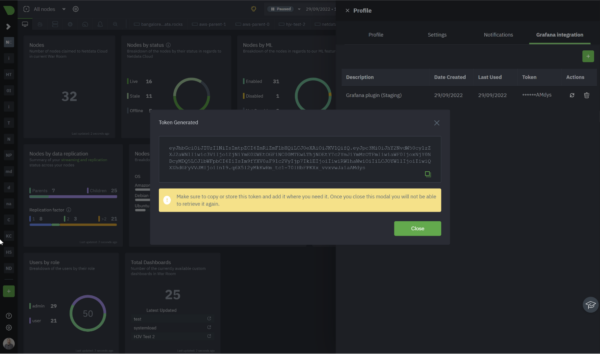
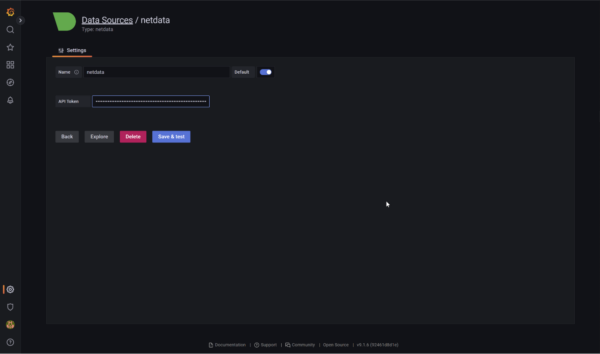
This API token will be required when you are installing the Netdata data source plugin on Grafana Cloud or locally
Having completed all the above steps, you’re ready to start taking advantage of Netdata’s troubleshooting capabilities in Grafana!
How does the Query builder work with the Netdata plugin?
Once you have selected Netdata as your data source, this is how the query builder will look.
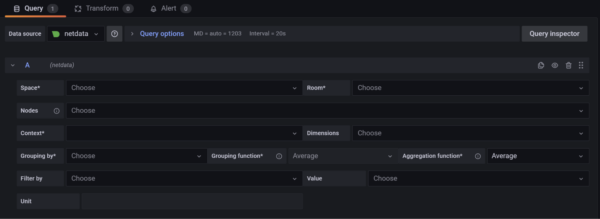
To retrieve data from our APIs the minimum attributes you need to define are: Space and Room, which will allow you to restrict to a specific set of Nodes, and Context (more on this) do define what metrics you want to retrieve. Having defined these 3 attributes you will be seeing data displayed on the chart, which should be the same as the one you see on your Overview tab on Netdata Cloud.
We provide additional attributes to: filter more on the data you are retrieving, define what kind of grouping you want to be applied and what aggregations. The attributes are as follows:
- Nodes - select one or more Nodes to be queried. blank means all Nodes.
- Dimensions - select which dimension(s) you want to filter on, you can even use wildcards. blank means all dimensions.
- Grouping by - what kind of grouping you want to apply: dimension, nodes, instances, etc.
- Grouping function - define what mathematical functional you want to apply over when multiple data sources.
- Aggregation function - define what aggregation you want to apply when the granularity of the data collected is higher than the plotted points on the chart.
- Filter by - using the available chart labels, which change from context to context, you can select a key-value pair to filter the data you want to see.
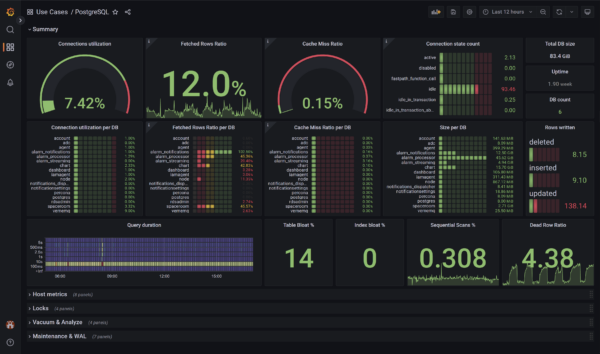
Sample dashboard
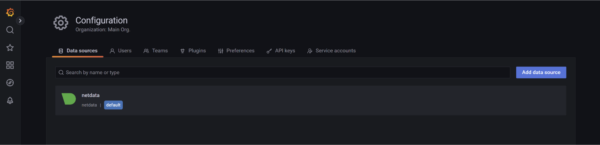
How to install it on your Grafana environment?
In order to start using the Netdata data source plugin on your Grafana envi ronment, local or Cloud, you need to install the plugin manually. Here are some tips to get through this depending on your setup:
- Docker
- Linux (local)
- Windows (local - powershell)
- Building the plugin locally
Docker
Pre-buit script - setup-demo-environment
We provide you a script setup-demo-environment.sh that will help you setting this up real fast. To start the container with the Netdata datasource plugin already installed you just need to:
setup-demo-environment.sh run
setup-demo-environment.sh remove
This script will:
- Spin up a grafana container without starting grafana itself
- Retrieve the latest available release of the Netdata datasource plugin
- Install the Netdata datasource plugin in /var/lib/grafana/plugins
- Start grafana
Manual step-by-step
- Setup your grafana docker container with the the permissions to load netdata plugin as an unsinged plugin
docker run -d --env GF_PLUGINS_ALLOW_LOADING_UNSIGNED_PLUGINS=netdata-datasource --name=grafana grafana/grafana
- Ensure you have the desired version of the plugin you want to install, get it from github releases
wget `curl -s https://api.github.com/repos/netdata/netdata-grafana-datasource-plugin/releases/latest | jq -r '.assets[] | select(.name|match("zip$")) | .browser_download_url'`
- Copy the contents of the Netdata data source plugin to Grafana plugins directory, by default /var/lib/grafana/plugins
unzip netdata-datasource-<version_number>.zipdocker cp netdata-datasource grafana:/var/lib/grafana/plugins/
Linux (local)
- Ensure you have the desired version of the plugin you want to install, get it from github releases
wget `curl -s https://api.github.com/repos/netdata/netdata-grafana-datasource-plugin/releases/latest | jq -r '.assets[] | select(.name|match("zip$")) | .browser_download_url'`
- Copy the contents of the Netdata data source plugin to Grafana plugins directory, by default /var/lib/grafana/plugins
unzip netdata-datasource-<version_number>.zipcp -rf netdata-datasource /var/lib/grafana/plugins
- Ensure that Netdata plugin which currently isn’t signed can be registered
vi /etc/grafana/grafana.ini- On allow_loading_unsigned_plugins entry add netdata-datasource
allow_loading_unsigned_plugins = netdata-datasource
- After adding the plugin a restart of grafana server is needed
- For init.d based services you can use the command:
sudo service grafana-server restart - For systemd based services you can use the following:
systemctl restart grafana-server
- For init.d based services you can use the command:
Windows (local)
- Ensure you have the desired version of the plugin you want to install, get it from github releases
- Going to https://github.com/netdata/netdata-grafana-datasource-plugin/releases/latest
- Downloading the zip file with the latest release, e.g. netdata-datasource-1.0.12.zip
- Grafana plugins, by default, should be under C:\Program Files\GrafanaLabs\grafana\data\plugins. Create a folder for netdata
mkdir ‘C:\Program Files\GrafanaLabs\grafana\data\plugins\netdata’
- Copy the contents of the Netdata data source plugin to the Grafana plugins directory, by default C:\Program Files\GrafanaLabs\grafana\data\plugins
Expand-Archive \.netdata-datasource-<version_number>.zip \.xcopy .\netdata-datasource\ "C:\Program Files\GrafanaLabs\grafana\data\plugins\netdata-datasource\" /E
- Ensure that Netdata plugin which currently isn’t signed can be registered
notepad ‘C:\Program Files\GrafanaLabs\grafana\conf\default.ini’- On allow_loading_unsigned_plugins entry add netdata-datasource
allow_loading_unsigned_plugins = netdata-datasource
- After adding the plugin a restart of grafana server is needed
net stop Grafananet start Grafana
Building the plugin locally
For any of the above steps if you prefer to build this plugin locally instead of retrieving it from from the releases you can:
- Clone this repo
git clone https://github.com/netdata/netdata-grafana-datasource-plugin
- Build it locally
yarnyarn build
What’s next?
Hoping the Open-Source community will take value from this plugin, we don’t plan on stopping here. We want to keep improving this plugin and we already have some enhancements on our backlog, including the following plans:
- Enabling variable functionality
- Allowing filtering with multiple key-value combinations)
- Providing sample templates for certain use-cases, e.g. monitoring PostgreSQL
Beside this, we would love to get the community involved in this project, like we do for the Netdata Agent repo, if you have ideas on things you would like to see or just share a cool dashboard you setup you are more than welcome to contribute just drop by https://github.com/netdata/netdata-grafana-datasource-plugin.
More Info
For more information, refer to the following links:
- What is Netdata?
- Netdata Cloud
- Netdata Agent
- Contexts
- Grouping by
- Grouping function
- Aggregation function (over time)
- Contributing
Hope you are ready and excited to start taking advantage of Netdata Grafana datasource plugin!
If you haven’t already, sign up now for a free Netdata account!
We’d love to hear from you – if you have any questions, complaints or feedback please reach out to us on Discord or Github.
Happy Troubleshooting!