High availability. This is what every monitoring tool needs to ensure that you never compromise on IT infrastructure visibility. On top of high availability, do you really want to enable all available features on your production system? It is important for the monitoring tool to have a low footprint on your CPU consumption and memory usage. Let’s dive deeper into the recommended way of configuring Netdata to ensure high availability and a low resource footprint through data replication.
First of all, each node monitored by Netdata has the ability to replicate its database to another node monitored by Netdata. Each Netdata node can play the role of a “Parent” (receive metrics) or a “Child” (send metrics). The Parent node can store all data collected by the Child node. This allows replicating collected data across multiple Netdata nodes that can be connected to the Netdata Cloud to increase data availability.
Netdata Cloud builds an infrastructure topology and directs traffic to available nodes, taking into account the availability aspect, retention, and distance from the production system. In case the data, for the requested time period, is already available on the Parent, Netdata Cloud does not need to query a Child directly as it is more likely running on your production system.
An example
You would like to monitor the Kubernetes cluster.
In this case, you would probably install Netdata on each node and connect it directly to the Netdata Cloud, as shown in the following diagram.
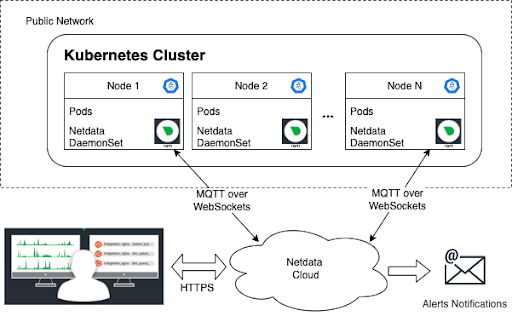
However, if Node 2 were to go down in this scenario, you would lose the data collected on this Node. By introducing the Parent, the data from Node 2 are streamed to the Parent in real-time, allowing you to keep querying the Parent to understand the state of the node before the node goes down, and this data will continue to be available even after Node 2 goes down, as shown in the following diagram.
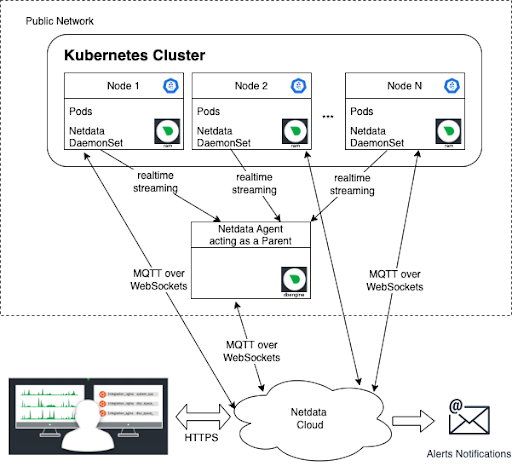
In case you would like to get the full benefit of the Netdata Parent/Child relationship, you can keep all of your Kubernetes nodes, or any other nodes outside of your Kubernetes cluster, inside your Private Network and allow only the Parent to be publicly accessible.
We recommend setting up two Parents streaming to each-other (active-active) and configuring all of your Children nodes to stream data to any of the Parents.
In this case, you can deploy Netdata as it is shown in the following diagram.
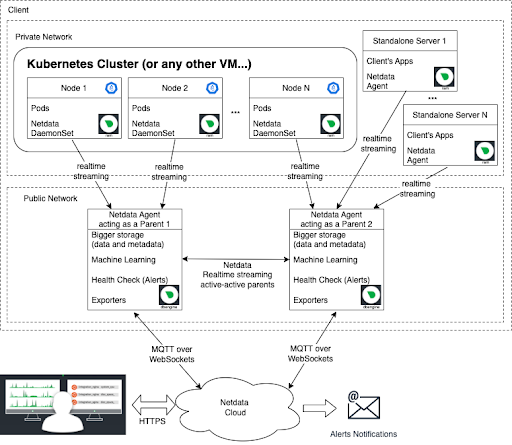
As you can see, this approach is more secure, as you do not need to expose all your production nodes to the public network. And it is more robust as well, due to high availability. By claiming the Parent node, all Child nodes will appear automatically in the dashboard.
Netdata Parent benefits
Let’s summarize the reasons it is important to introduce Netdata Parent inside your ecosystem:
- Production nodes are secure and not addressable from the outside world
- Production nodes do not have (reliable) internet connection
- Production nodes are ephemeral (can go away at any point in time, but we need to keep their data for post-mortem analysis)
- Production nodes do not have (or shouldn't provide) the resources for monitoring (when for example we need to maintain long retention or execute a lot of data queries)
- We need high availability of metric data
For example, you do not need to run Machine Learning on every Production Agent (Child) as it can be only enabled on Parent as well as the health checks (alerts). You can attach bigger storage to keep more data on the Parent as you can have some limitations on your Child.
Below there are a few examples for Parent and Child configs. These will allow you to reduce the resource constraints and decrease the load on production systems.
Parent - Child setup
In order to setup a streaming from Child to Parent, we need to instruct the Child to stream data to Parent and for Parent to allow the streaming from a Child. So, both agents need to edit their stream.conf. In addition, when setting up streaming, we use an API key.
To find more details about various configuration setups and options go here.
An API key is a key created with by the user with “uuidgen” and is used to provide some level of “security” and/or customization in the Parent side. I.e. a Child will stream using the API_KEY, and a Parent is configured to accept connections from Child but can also apply different options to a child using the API_KEY or to another child using the ANOTHER_API_KEY.
In essence though, every Child on a user’s setup can use the same API_KEY if no special config is required.
In this simple setup (a Child streaming data to a Parent) we need the following configuration:
Child config
The recommended way is to not claim the Child directly during your setup to avoid establishing an ACLK connection between Netdata Agent and Netdata Cloud.
netdata.conf
As already described, it is important to reduce the footprint of the Netdata Agent on your production system; this is why some capabilities can be switched OFF on the Child and keep them ON on the Parent.
For example, Machine Learning can be disabled on the Child node and allow only the Parent to calculate it for you. The same applies for the Health Checks.
On the child node, edit netdata.conf by using the edit-config script: /etc/netdata/edit-config netdata.conf set the following parameters:
[db]
    # https://learn.netdata.cloud/docs/agent/database
    # none = no retention, alloc = some retention in ram
    mode = alloc
    # in case of alloc, retention in seconds
    # how much tolerance the child has to find a parent in order to transfer the data
    # for IoT can be lowered to 120
    retention = 1200
    # you may increase this to lower CPU resources
    update every = 1
[ml]
    # disable Machine Learning
    enabled = no
[health]
    # disable Health Checks
    enabled = no
[web]
    # disable local dashboard
    bind to = lo
[plugins]
    # disable all external plugins on extreme IoT cases
    # enable running new plugins = no
stream.conf
You would also need to change the edit stream.conf by using the edit-config script: /etc/netdata/edit-config stream.conf to configure multiple parents. The Netdata Child will pick the 1st successful connection to stream data. In case the Parent 1 is not available, it will automatically pick the next one.
Set the following parameters:
[stream]
    # stream metrics to another Netdata
    enabled = yes
    # the IP and PORT of the parent, you can set multiple destinations
    destination = PARENT_1_IP_ADDRESS:19999 PARENT_2_IP_ADDRESS:19999
    # API KEY - created by the user with uuidgen and is used to provide some level of “security” and/or customization in the parent side.
    api key = API_KEY
Parent config
Here, we will not only configure the streaming but also provide an example configuration for the tiering. To learn more about tiering go here. You can also learn more about how Netdata stores metrics here.
Example config for 10 children, for about 2k metrics each.
- 1s granularity at tier 0 for 1 week
- 1m granularity at tier 1 for 1 month
- 1h granularity at tier 2 for 1 year
- 25GB of disk
- 3.5GB of RAM (2.5GB under pressure)
netdata.conf
On the Parent node, edit netdata.conf by using the edit-config script: /etc/netdata/edit-config netdata.conf and set the following parameters:
[db]
    mode = dbengine
    storage tiers = 3
    # to allow memory pressure to offload index from ram
    dbengine page descriptors in file mapped memory = yes
    # storage tier 0
    update every = 1
    dbengine multihost disk space MB = 12000
    dbengine page cache size MB = 1400
    # storage tier 1
    dbengine tier 1 page cache size MB = 512
    dbengine tier 1 multihost disk space MB = 4096
    dbengine tier 1 update every iterations = 60
    dbengine tier 1 backfill = new
    # storage tier 2
    dbengine tier 2 page cache size MB = 128
    dbengine tier 2 multihost disk space MB = 2048
    dbengine tier 2 update every iterations = 60
    dbengine tier 2 backfill = new
[ml]
    # Enabled by default
    # enabled = yes
[health]
    # Enabled by default
    # enabled = yes
[web]
    # Enabled by default
    # bind to = *
stream.conf
On the Parent node, edit stream.conf by using the edit-config script: /etc/netdata/edit-config stream.conf, and then set the following parameters:
[API_KEY]
    # Allow receiving metrics from other Agents with the specified API key
    enabled = yes
Parent - Parent (active-active) setup
In order to setup an active-active streaming between Parent 1 and Parent 2, you need to instruct Parent 1 to stream data to Parent 2 and Parent 2 to stream data to Parent 1. So, in both, cases need to edit their stream.conf.
On both Netdata Parent nodes, edit stream.conf by using the edit-config script: /etc/netdata/edit-config stream.conf to configure parents synchronization
Set the following parameters on Parent 1:
[stream]
    # stream metrics to another Netdata
    enabled = yes
    # the IP and PORT of the parent, you can set multiple destinations
    destination = PARENT_2_IP_ADDRESS:19999
    # API KEY - created by the user with uuidgen and is used to provide some level of “security” and/or customization in the parent side.
    api key = API_KEY
[API_KEY]
    # stream metrics to Parent 2
    enabled = yes
Set the following parameters on Parent 2:
[stream]
    # stream metrics to another Netdata
    enabled = yes
    # the IP and PORT of the parent, you can set multiple destinations
    destination = PARENT_1_IP_ADDRESS:19999
    api key = API_KEY
[API_KEY]
    # stream metrics to Parent 1
    enabled = yes
Your turn
In case you need more help, please do not hesitate to reach out to us on Discord or Github. We would be happy to understand your challenges and address your needs now or in future releases.
